How to Convert Videos for Instagram 2026: Complete Size, Format and Resolution Guide
Instagram requires specific video formats, dimensions, and durations for each content type, and getting these wrong results in automatic compression that destroys your video quality. This guide provides the exact specifications for every Instagram format in 2026, plus the best free tools to convert your videos correctly before uploading. How to Reduce Video File Size Without Losing Quality: 3 T…
The universal safe format is MP4 with H.264 video codec and AAC audio, at a maximum of 30fps. But dimensions and duration limits vary dramatically between Reels, Stories, Feed posts, and IGTV. Convert Video for TikTok 2026: Best Format, Specs, and Fr…
Instagram Video Specifications 2026: The Complete Reference
Instagram’s video requirements have evolved significantly. Here are the current specifications for every format: How to Convert Video for TikTok in 2026: Best Formats, To…
Instagram Reels (2026):
- Aspect ratio: 9:16 (vertical)
- Resolution: 1080 x 1920 pixels (minimum 720p)
- Duration: 15, 30, 60, or 90 seconds
- Format: MP4 (H.264)
- Frame rate: 30fps recommended (60fps accepted but may be downsampled)
- Max file size: 4GB
- Audio: AAC, stereo, 128kbps minimum
Instagram Stories:
- Aspect ratio: 9:16 (vertical)
- Resolution: 1080 x 1920 pixels
- Duration: Up to 60 seconds per story segment (videos longer than 60 seconds are auto-split)
- Format: MP4 (H.264)
- Max file size: 4GB
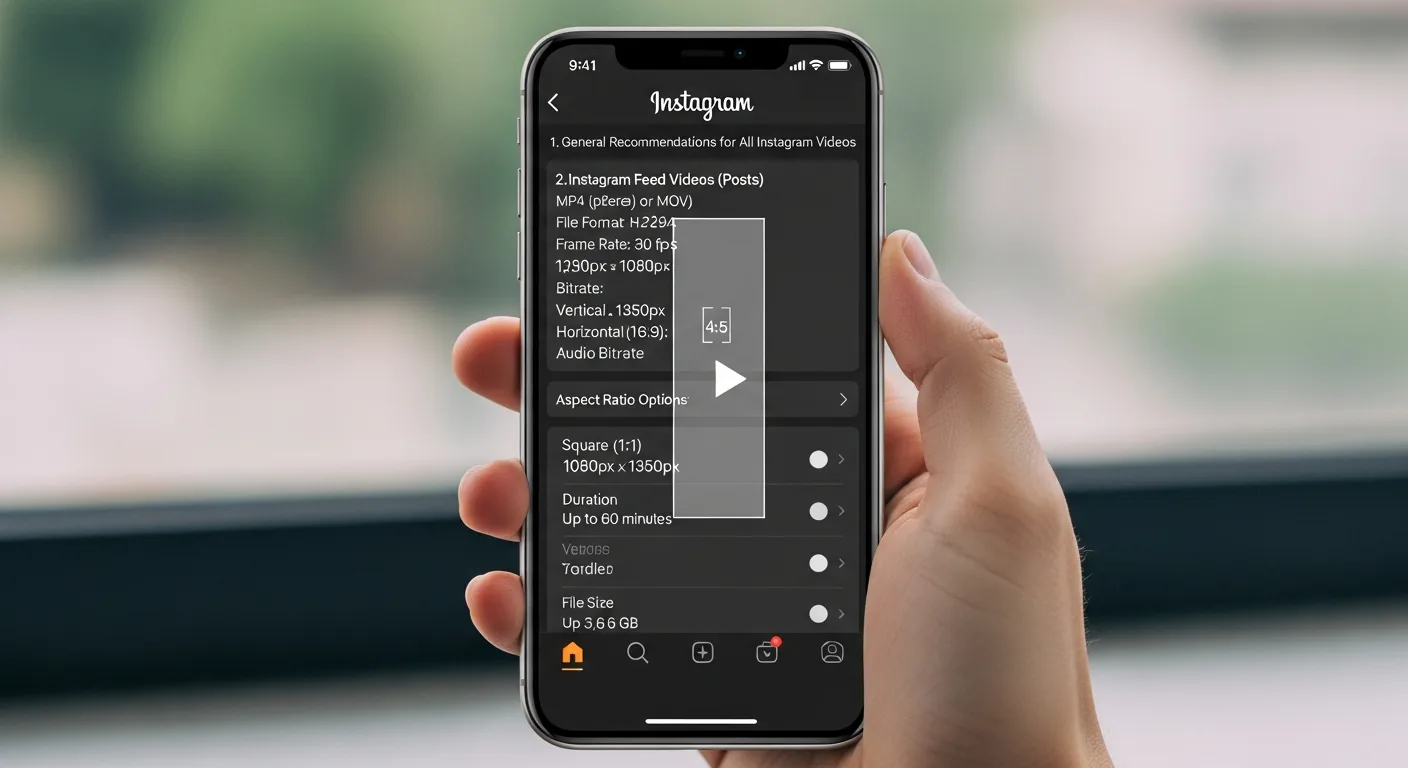
Instagram Feed Videos:
- Aspect ratio: 1:1 (square), 4:5 (portrait, recommended), or 16:9 (field)
- Resolution: 1080 x 1350 pixels (4:5), 1080 x 1080 (1:1), or 1920 x 1080 (16:9)
- Duration: 3-60 seconds
- Format: MP4 (H.264)
- Frame rate: 30fps
- Max file size: 4GB
Instagram Live (recorded):
- Aspect ratio: 9:16
- Resolution: Up to 1080 x 1920
- Duration: Up to 4 hours
Critical tip: Always upload at the maximum recommended resolution (1080px width minimum). Instagram compresses all videos during upload, and starting with a higher-quality source produces a better-looking result after compression. Uploading a 720p video that gets further compressed looks noticeably worse than uploading 1080p that gets slightly compressed. CloudConvert vs Zamzar vs Online-Convert (2026): Which On…
Best Free Video Converters for Instagram
HandBrake (Desktop, Best Free Option): HandBrake is open-source and handles any video format to Instagram-compatible MP4 conversion. For Instagram optimization, use these settings: MP4 container, H.264 codec, CRF 18-20, 30fps, AAC audio at 160kbps, and resize to 1080px width. HandBrake’s preset system lets you save Instagram-specific settings for one-click future conversions.
CapCut (Mobile & Desktop, Best for Editing + Export): CapCut is free, made by ByteDance (TikTok’s parent company), and produces Instagram-optimized exports. It includes templates with correct Instagram aspect ratios, automatic caption generation, effects, and music. When exporting, select 1080p quality and the specific Instagram format (Reel, Story, or Post). CapCut is the best option for users who want to edit and convert in one step.
CloudConvert (Online, Best No-Install Option): For quick format conversions without editing, CloudConvert handles the job reliably. Upload your video, set output to MP4 (H.264), adjust resolution to match Instagram specs, and download. Free for files up to 1GB with 25 daily conversions.
FFmpeg (Command Line, Most Flexible): For batch conversion or automated workflows, FFmpeg provides the most control. A single command converts any video to Instagram-ready format:
ffmpeg -i input.avi -vf "scale=1080:1920:force_original_aspect_ratio=decrease,pad=1080:1920:(ow-iw)/2:(oh-ih)/2" -c:v libx264 -crf 18 -r 30 -c:a aac -b:a 160k output.mp4 (source: NIST cybersecurity guidelines)
This command scales to 1080×1920 with padding, encodes with H.264 at high quality, limits to 30fps, and converts audio to AAC. (source: peer-reviewed tech research)
How to Convert Field Videos to Vertical for Reels
Most video content is shot in field (16:9), but Instagram Reels and Stories require vertical (9:16). Here are three approaches to handle this conversion:
Option 1: Crop (loses content but fills frame): This approach cuts the sides of a field video to fit a vertical frame. You keep the center portion of the video but lose the left and right edges. Best for content where the important action is centered. In HandBrake, set the resolution to 1080×1920 and choose “crop” for the anamorphic setting.
Option 2: Letterbox/Pillarbox (preserves all content): This places the field video in the center of a vertical frame with black bars (or custom-colored bars) above and below. You keep all content but the video appears smaller. This is common for repurposing YouTube videos to Reels. In FFmpeg, the pad filter adds the necessary bars automatically.
Option 3: Blur background fill (best of both worlds): This zooms and blurs the original video as a background, then overlays the sharp original at a smaller scale in the center. This creates a visually appealing vertical video without losing content. CapCut offers this as a one-click effect called “Blur Background.” In FFmpeg, it requires a more complex filter chain but produces professional results.
Our recommendation: Use blur background fill for maximum visual appeal, letterbox for content where every pixel matters (tutorials, presentations), and crop only when the subject is clearly centered. For detailed format comparisons, see our AVI to MP4 converter guide and our MOV to MP4 guide.
Instagram Video Quality Tips: Avoid the Compression Trap
Instagram’s compression algorithm is aggressive, and many creators unknowingly make it worse by uploading videos that trigger extra processing. Follow these rules to maximize quality:
Rule 1: Upload at exact spec dimensions. If your video is 1920×1080 (field) and you’re posting a Reel, convert to 1080×1920 before uploading. When Instagram has to resize your video server-side, it applies additional compression that reduces quality beyond the normal processing.
Rule 2: Use H.264 High Profile. Instagram’s encoder handles H.264 best. Videos in other codecs (H.265, VP9, AV1) get transcoded server-side, adding another generation of quality loss. Stick with H.264 for the cleanest upload-to-display pipeline. For more information, check out download videos for free.
Rule 3: Slightly over-bitrate. Because Instagram will compress your video, uploading at higher-than-normal quality gives the compression algorithm more data to work with, resulting in a better final product. A CRF of 18 (instead of the usual 23) provides this buffer without making files unmanageably large.
Rule 4: Avoid dark scenes and fast motion. Instagram’s compression struggles most with low-light footage and rapid movement, creating visible blocking artifacts and blur. If possible, ensure good lighting and steady camera work. In post-production, slightly increasing brightness and adding a small amount of noise reduction before uploading helps the encoder handle these challenging scenes.
Rule 5: Upload via mobile app. Instagram’s desktop uploader and third-party scheduling tools sometimes apply additional compression or format conversion. For the highest quality, upload directly from your phone’s gallery to the Instagram app. Transfer your converted video to your phone first, then upload natively.
Frequently Asked Questions
What video format does Instagram accept?
Instagram accepts MP4 and MOV files with H.264 video codec and AAC audio. While other formats may upload successfully, they trigger server-side conversion that reduces quality. For the best results, always convert to MP4 with H.264 encoding before uploading. Maximum file size is 4GB across all formats (Reels, Stories, Feed). Video resolution should be at least 720p, with 1080p strongly recommended for optimal quality after Instagram’s compression.
Why does my Instagram video look blurry after uploading?
Blurry video usually results from one of three issues: uploading in a resolution lower than 1080p (Instagram compresses further and amplifies quality loss), uploading in a non-native format that triggers server-side transcoding, or uploading via desktop/third-party tools instead of the mobile app. To fix: ensure your video is exactly 1080×1920 for Reels/Stories or 1080×1350 for feed posts, use H.264 MP4 format, encode at CRF 18-20, and upload from the mobile app.
Can I upload 4K video to Instagram?
You can, but Instagram will downscale it to 1080p maximum. Uploading 4K doesn’t result in higher quality on Instagram, it only increases upload time and data usage. However, some creators report slightly better quality from 4K uploads because Instagram’s compression has more source data to work with. The practical sweet spot is 1080p at high bitrate (CRF 18), which provides excellent quality without excessive file size.
How do I convert YouTube videos for Instagram Reels?
Download the YouTube video in the highest available quality, then convert from field (16:9) to vertical (9:16) using one of the three methods described above (crop, letterbox, or blur background). CapCut makes this easiest with its built-in aspect ratio templates and blur background effect. Keep the video under 90 seconds for Reels format. Important: only repurpose your own content or content you have explicit permission to use.
What’s the maximum video length for Instagram in 2026?
Instagram Reels: up to 90 seconds (options for 15, 30, 60, or 90 seconds). Instagram Stories: up to 60 seconds per segment, with automatic splitting for longer videos. Instagram Feed videos: 3 to 60 seconds. Instagram Live: up to 4 hours. For long-form content beyond these limits, consider posting to YouTube or TikTok instead, then using Instagram to promote clips that drive traffic to the full video.